


Navigation : click on the blue words to quickly navigate through the page: RX thorax – Musculoskeletal – Myelography – Arthrography -. Abdomen – Esophagus- stomach-duodenum – Small intestine – Colon – Gal_Pancreas – Urogenital_system – Pyelography – Cystography – Fallopian tubes – Mammography – Galactography – Pneumocystography – Harpooning -Mammotomy
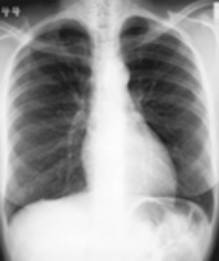
RX thorax
This is the most frequently performed examination in the radiology department. A chest radiograph can be requested for many reasons.
 | As a routine examination at a screening e.g. occupational medicine, pre- and post-operative |
| When a lung injury is suspected |
| For shortness of breath |
| As a follow-up to the effect of a treatment |
| In case of trauma to the chest |
There are basically two ways to take a chest radiograph:
| The standing shot where usually a face and profile shot is taken |
| Reclining admission in a patient who cannot stand, normally only face admission unless otherwise requested |
The musculoskeletal system
Perhaps the most well-known examination in radiology. Namely, the photographs of the bones.
The indications for this can vary widely.
| Trauma : detecting fractures, luxations,. |
| Tumors : both benign and malignant tumors can be seen on the radiographs |
| Osteoporosis: osteoporosis |
| Osteoarthritis and arthritis |
| Detection of hereditary bone defects |
Preparation:
 | In general, no specific preparation is necessary |
| However, it is important that there is no contrast in the intestines, when recording vertebrae and pelvis |
Aftercare:
| No specific aftercare to be observed. |
Myelography
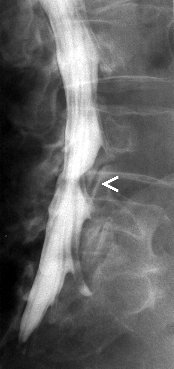
Myelography is the imaging of the spinal canal by means of a counteragent. This is injected by puncture into the dural sac in the low back. So a puncture is made in the back so that a needle can pass between the vertebrae into the spinal canal. This can be done under local anesthesia, but this is not a rule. It is stated that the needle must be pricked in any case. Recordings can be taken at the level of the neck, chest or low back. After the puncture, conventional recordings are taken after which the patient is taken to the CT scan to take axial images in the region where there may be problems.
However, this examination is increasingly being replaced by an MRI of the back, as it is less invasive, less risky and better tolerated by patients.
Indications:
| Detecting a degenerative intervertebral disc |
| Tumoral process between the vertebrae |
| Trauma with fracture or displacement of a vertebrae |
| Post operative problems |
Preparation:
| The patient need not be sober, although this is standard practice in many hospitals. |
| In any case, watch out for contrast allergy. |
| The patient is taken to radiology by bedside |
| Sometimes an eye fundus examination is done, this is to rule out papilledema which is a contraindication for lumbar puncture. |
Aftercare:
| Mandatory bed rest of 24h, to allow the pressure differences due to the puncture to dissolve. |
| It is recommended to take extra fluids, drinking for example, or an IV if necessary. |
| If headaches occur, bed rest is best prolonged. |
Arthrography
An arthrography is performed to visualize a joint cavity. To do this, a contrast medium is injected into the joint. Often air is also injected. This is to obtain a clearer image of the cartilage surfaces of the joints. After several shots in conventional radiology, a CT scan is done to better evaluate the joint. Local anesthesia can be given but is not the rule, remember that a puncture is always given, often the puncture only requires one puncture, with the anesthesia it becomes two.
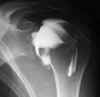
An arthrography can also be done in preparation for an MRI examination. The indications and the pre- and aftercare remain identical.
Indications:
| Injuries to tendons and/or ligaments of the joint |
| Injuries of the joint capsule |
| Dislocation |
| Bone or cartilage injuries |
| Joint mice (these are small pieces of bone found loose in the joint) |
Preparation:
| Possibly undressing the puncture site, such as shoulder, hip, … |
| Liberally disinfect the puncture site to eliminate all risk of infection |
| Before injecting the contrast, it is best to take a photograph of the joint to be examined. |
Aftercare:
| Helping the patient off the examination table (watch out for syncope) |
| Help the patient get dressed if necessary, the examined joint should be stressed as little as possible, remember that the examination is not over now |
| Getting the patient to the CT scan as soon as possible |
After the examination the patient may experience a “sloshing” sensation in the joint for some time, this is normal since a fluid and air were injected. Pain may also occur. For this pain a classic painkiller can be taken. If the pain gets worse or does not go away, it is advisable to contact the doctor for more specific pain medication.
The gastrointestinal system
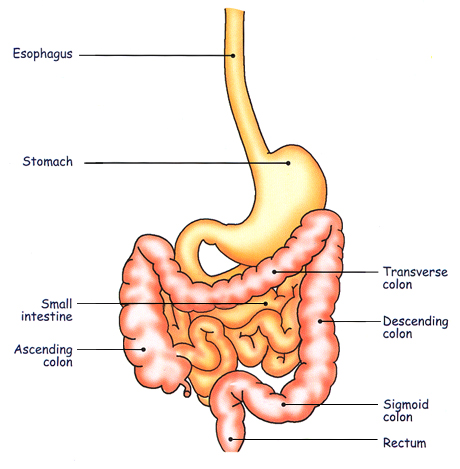
RX abdomen overview
A recording of the abdomen to assess abdominal pain. Is taken without contrast.
Purpose is to see any kidney or gallstones, detect free air in the abdomen and make an assessment of the intestines. A check is made to see if the intestines are not dilated and whether or not air-fluid levels can be seen.
Preparation :
No specific preparations are needed here
Esophagus – stomach – duodenum (SMD)
Here, by means of a drunk solution of Barium, the gastrointestinal tract is visualized.
This allows detection of any abnormalities in the structure of the wall, such as, for example, inflammation or ulcerations or even tumors.
Preparation :
| The patient should be sober from at least four hours before the examination | |
| Always include reason for examination and any recently undergone operations |
Aftercare:
| Have the patient drink enough to avoid hardening of barium (=baritomes) in the colon | |
| If bowel movement problems occur, administer a laxative if necessary |
RX transit
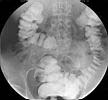
The small intestine is examined by means of a drunk contrast medium. This allows the radiologist to get an idea of the shape structure and course of the small intestine as well as the speed at which the fluid passes through it.
Preparation:
| Sober at least since four hours before the examination |
| No contrast residue from a previous examination should be present |
| Provide sufficient data for the radiologist so that a good history is formed. |
Aftercare:
| Prevent constipation by drinking enough, this to prevent the formation of baritomas |
| If constipation occurs, administer a laxative. |
| White stool after the examination is perfectly normal given the color of the ingested contrast. |
RX colon or colon enema
An examination of the colon by means of a fluid introduced via rectal probe. Again, the aim is to assess the colon for shape and structure. It looks for abnormalities in the intestinal mucosa, the presence of polyps and any strictures.
Preparation :
| The patient should be sober since at least four hours before the examination |
| beforehand, the patient is given a laxative so that the colon is clean |
| good anamnesis |
Aftercare:
| Allow adequate drinking to avoid constipation |
| Administer a laxative if necessary |

Endoscopic Retrograde Cholangio- Pancreaticography (E.R.C.P.).

A specific examination for the pancreas and bile ducts. It is done in cooperation with an internist who performs the endoscopy. The endoscope is inserted through the mouth up to the level of the outflow of the bile ducts in the small intestine (at the Vater’s papilla), where contrast is introduced into the bile ducts through a thin catheter. In this way, any gallstones present can be visualized. It is also possible to remove the gallstones during the examination.
Preparation :
| The patient has been sober since at least four hours before the examination |
| Best he/she is taken by bed to the radiology department |
| A watchful infusion is inserted, to catch any problems during the examination, and to administer pain medication and anesthesia |
| Preliminary photo of the liver region is taken before the examination |
Aftercare:
| Attention to waking up the patient correctly |
| Infusion as long as the patient cannot drink sufficiently on his or her own |
| Pain medication as needed |
Intravenous pyelography (I.V.P.)
After administration of intravenous contrast, we can take pictures of the kidneys and their course to the bladder.
In this way, we obtain information about the function of the kidneys. In addition, we have a picture of the course of the ureters and the shape and position of the kidneys and bladder.
| Administer a laxative the day before the examination so that the bowels appear as clean as possible |
| The patient should be sober for at least four hours before the examination |
| No contrast may be present from a previous examination |
| CAUTION for contrast allergy !!! |
Aftercare:
| After the examination, have plenty of fluids to help the kidneys “wash out” the contrast |
| With contrast allergy, always be mindful of late reactions |
The Uro-General System
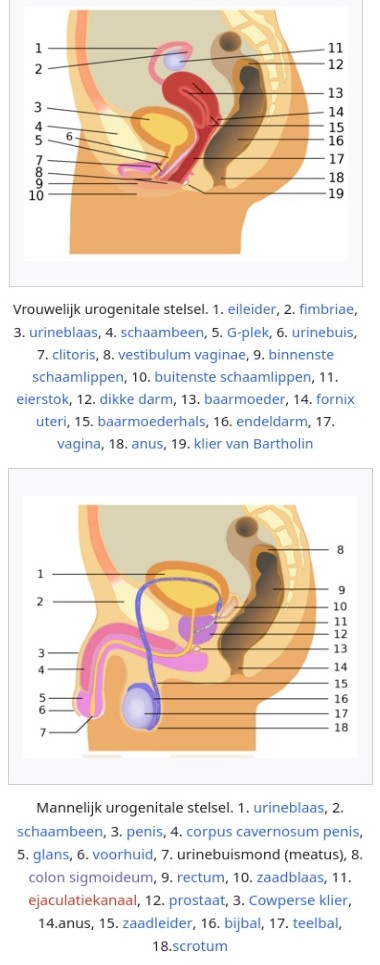
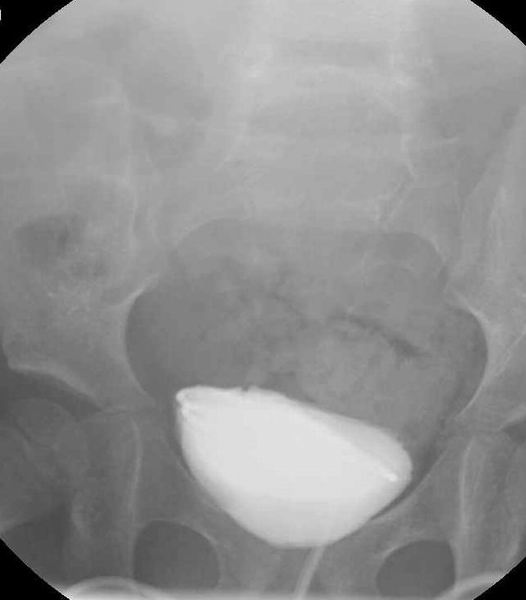
Cystography
Here we obtain an image of the bladder by direct introduction of a fluid into the bladder through a probe. This can be inserted retrograde along the urethra or through a supra-pubic probe into the bladder.
Preparation:
| No contrast may be present from a previous examination |
| For cystography along suprapubic probe, patient’s bladder must be well filled |
Aftercare
| No specific aftercare required |
Hysterosalpingography
Examination done as part of fertility testing. The purpose is to obtain a picture of the course of the fallopian tubes. In this way, passage can be checked.
Preparation:
| There must be no known contrast allergies |
| The examination is best done between the 8th and 12th day of the menstrual cycle |
Aftercare:
| Sanitary napkins provided, there may be a little blood after the examination |
| Beware of syncope |
Mammography
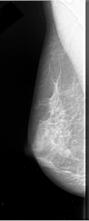
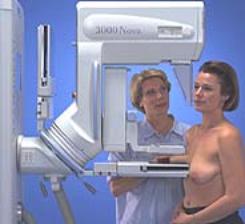
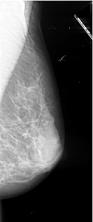
Here, pictures of the breast tissue are taken using a device specially designed for this examination. Here, the breast is compressed to get a better view of the tissues as well as to minimize radiation exposure.
Indications:
| As screening, to detect any tumors in time |
| With clinical suspicion of a possible tumor (e.g., a lump that is palpable). |
| Follow-up of known breast tumors |
| The examination can also be performed in men. |
Preparation:
| Good explanation by the performing technician or physician |
| Examination is best done after menstruation |
Aftercare:
| Being clear to patients and not causing misplaced concern |
| Clear agreements on communicating results |
Counterindications:
| In pregnancy and lactation |
| In very young women, as there will be a lot of glandular tissue and the mammogram will not give enough information |
A mammogram will often include an ultrasound. The ultrasound often serves to supplement the photographs. After all, both examinations reveal different issues.
Galactography
Filling the milk ducts with contrast and then making a mammogram.The examination is sometimes indicated if there is fluid coming from the nipple opening, especially from one opening, if the fluid is bloody or brownish colored. The examination is not appropriate if milk fluid is secreted from multiple orifices on both sides.
Preparation:
No specific preparation is required.
Aftercare:
No specific aftercare.
Pneumocystography
This examination is performed less and less due to the ever-improving ultrasound. The idea here is to fill an existing cyst with air so that they would appear more clearly on a mammography photograph. Which improves its assessment.
Preparation:
No specific preparation
Aftercare:
No specific aftercare.
Harpoon marking
A suspicious location in the breast is punctured and then checked. That way, the correct location of the piece to be removed can be determined before surgery. Thus, only suspicious tissue can be removed without having to immediately remove the entire breast…. The needle will be monitored under ultrasound or mammography depending on the tumor.
Preparation:
| The patient is admitted to a ward and escorted to radiology |
| Attention to the patient’s fears and questions |
| Good arrangements with operating room which then uses markage for biopsy |
Aftercare:
specific postoperative follow-up. Indeed, after the markage, the patient goes to the operating room where a biopsy is taken of the marked lesion.
Mammotomy
In this technique, under local anesthesia, a thick hollow needle is inserted under ultrasound or stereotactic (under mammographic image) guidance, right up against the lesion. By suction, the lesion is sucked into this needle, so to speak; the tissue state is cut off and then aspirated through this hollow needle. Multiple samples of tissue are taken (up to 20 or so).
Mammotomy is employed to remove small groups of microcalcifications and sometimes to remove small benign lesions.
Course:The patient takes place on an examination table lying on the abdomen with the chest entering a round opening. The table is raised so that work can be done easily. Under radiographic guidance, a puncture is then performed under local anesthesia. If the puncture is performed under ultrasound guidance, the patient can sit on an examination table on her back. In principle, there is only one puncture per lesion.
Advantages:
A major advantage of mammotomy is that no general anesthesia must be undergone, and this while the biopsy results are as good as surgical biopsies. Also, the scar is only a few millimeters in size.
Disadvantages:
In principle, there are few disadvantages to this technique. However, we withhold a possibility of small local internal bleeding (bruising). Furthermore, it must be made clear that this technique is for diagnostic purposes and thus cannot completely replace surgical intervention. Although in many cases it will offer the possibility of avoiding just that.